DIY Painted Planter
This isn't a super helpful instructional DIY post. For one, it's literally just slapping some paint on a terracotta planter so it's hardly impressive. But also, if you pop onto Pinterest and type in "DIY painted planter" in the search box, you'll be bombarded with a plethora of creative designs that are a lot cooler than mine. And yet, I still want to share this with you. Why? Because of the greenhouse for which these planters were meant. Bam! I didn't end that sentence with a proposition so props to me.
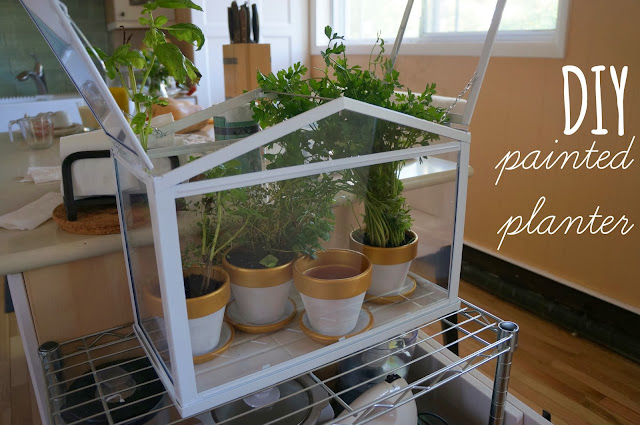 As you may know, my kitchen renovation took over my life for the past few months. This renovation has required several trips to Ikea and way back when, during a particular trip in July, I fell in love with a mini tabletop greenhouse. My sister discouraged me from buying it at first because she kept insisting we should wait until our kitchen was finished to buy decorative items. But finally, during our most recent trip to Sweden's greatest gift to us, she caught me lusting after it again and told me that I was obviously in love with that thing and I should just get it. Hoorah. Great decision.
I decided I wanted to use it to house some fresh herbs that could be used year round. Over the spring and summer, we grew basil, lemon thyme, parsley, and sage in our garden and with the weather turning colder, it was the perfect time to dig them out of the ground and plop them indoors. I bought some terracotta planters and matching dishes from Home Depot.
The planters looked okay as is, but I was bored and decided to paint them. After a bit of mulling, I decided white and gold would look pretty with the greenery and would look nice inside of the mini greenhouse.
You'll need:
-terracotta planter(s) (choose an appropriate size for your plants)
-acrylic paint (I chose gold and white)
-paint brush
-water
-paper towel
-palette
-acrylic spray sealer
+ plants
+ indoor potting soil
+ mini greenhouse (optional, duh)
 Some DIY instructions out there tell you to use a damp sponge to wipe the dust off of the planter but then you have to wait for it to dry. I was really impatient so I just used a paper towel and rubbed it all over just to take off any dust. Then I got right into painting and it worked out fine. If you want a really opaque finish, it might take a few coats, depending on the quality of your paint. I also recommend that you paint so that the strokes follow the circumference of the planter instead of going up and down. It makes the brushstrokes less noticeable.
 Let the paint dry fully between coats. If not, you might notice some streaking and "bald" patches because the second coat almost tugs the first half-dry coat off. Once you're finished painting, let the planters dry completely for at least an hour. If you can, let them dry for a day so that the paint can set. By the way, sorry for the blue tinge in these photos; I was watching television while I was crafting.
I didn't paint the bottoms - because who's going to see them? - but I did paint inside the lip of the pot just a bit. Once the herbs are planted, the majority of the inside of the pot won't be visible but I didn't want there to be an awkward line where the paint just stopped.
 Once the paint is set, bring everything outside (or to your garage if it's raining, like it was in my case). Then, take a clear acrylic coating - I used this one which has a matte finish - and spray down the planters all over, even where there isn't paint. The sealer will make sure the paint lasts a long time. Also, because the clay is porous, it will absorb moisture when the plants are watered and there's a possibility that the paint may bubble or crack if it isn't sealed.
Let this dry for at least 24 hours before planting anything in the pots. You need to give the sealer time to set and also time for the fumes to blow off so that your precious greens don't end up poisoned.

 And this next batch of pretty photos shows the planters in action. I love it. As you can see, one of the planters is empty. The sage was being uncooperative so I decided to leave it be in the garden box. I think I'm going to try and find a cilantro plant to take its place, though it may be hard to find plants these days, now that it's approaching winter time.
I used an indoor potting soil (not topsoil) and carefully uprooted my plants and carefully potted them. Topsoil is meant for outdoor use and is meant to supplement the soil in your outdoor garden. Potting soil is meant to provide a whole separate environment for your plants as close to the outdoors as possible so it has more nutrients and drains a bit better. This also means potting soil will need to be replaced every so often.
 The smell these herbs bring to the kitchen is intoxicating. Especially the lemon thyme.
 I don't know if this is becoming an annoying photo overload, but I just think it's so pretty, I can't help it. I need to share every angle.
 This last shot is one I
 wanted needed to share because we had just finished grouting the tile backsplash behind the sink and I thought you should see it in all its wondrous glory. Don't you love it? I think it came out beautifully. If you want to see the details of the backsplash, head over to my food blog where I share all about my new kitchen.
 Cheers!

I decided I wanted to use it to house some fresh herbs that could be used year round. Over the spring and summer, we grew basil, lemon thyme, parsley, and sage in our garden and with the weather turning colder, it was the perfect time to dig them out of the ground and plop them indoors. I bought some terracotta planters and matching dishes from Home Depot.
The planters looked okay as is, but I was bored and decided to paint them. After a bit of mulling, I decided white and gold would look pretty with the greenery and would look nice inside of the mini greenhouse.
You'll need:
-terracotta planter(s) (choose an appropriate size for your plants)
-acrylic paint (I chose gold and white)
-paint brush
-water
-paper towel
-palette
-acrylic spray sealer
+ plants
+ indoor potting soil
+ mini greenhouse (optional, duh)


I didn't paint the bottoms - because who's going to see them? - but I did paint inside the lip of the pot just a bit. Once the herbs are planted, the majority of the inside of the pot won't be visible but I didn't want there to be an awkward line where the paint just stopped.

Let this dry for at least 24 hours before planting anything in the pots. You need to give the sealer time to set and also time for the fumes to blow off so that your precious greens don't end up poisoned.

This is my finished and coated planter. What do you think? Cute, right?

I used an indoor potting soil (not topsoil) and carefully uprooted my plants and carefully potted them. Topsoil is meant for outdoor use and is meant to supplement the soil in your outdoor garden. Potting soil is meant to provide a whole separate environment for your plants as close to the outdoors as possible so it has more nutrients and drains a bit better. This also means potting soil will need to be replaced every so often.


Comments
Post a Comment