DIY Decoupage Dresser
Okay, so this isn't really a travel-related post but I wanted to share it on my blog nonetheless. It is a money-saving idea and that saved money can be put towards a trip so I think it's sort of relevant.
 What you'll need:
Then I cut out the image with scissors, being careful not to snip off any of the lovely details. Then, I placed the image on my dresser where I thought it would look best. Then I marked off where the drawers were with a pencil. If there were empty spaces between the drawers, I would've marked those off too so I could decoupage some skinny pieces in the middle but luckily, I was able to save myself some time with my no-fuss dresser. It's hard to see the lines in that last photo but I took a straight edge and drew lines where I made pencil marks.
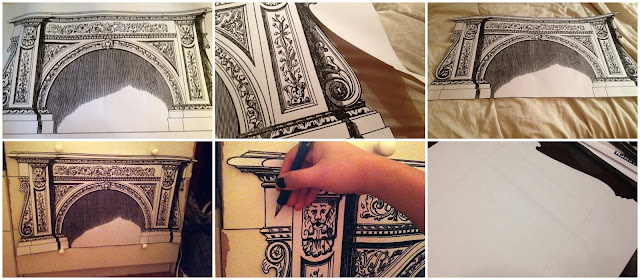 Then I cut the image into three pieces.

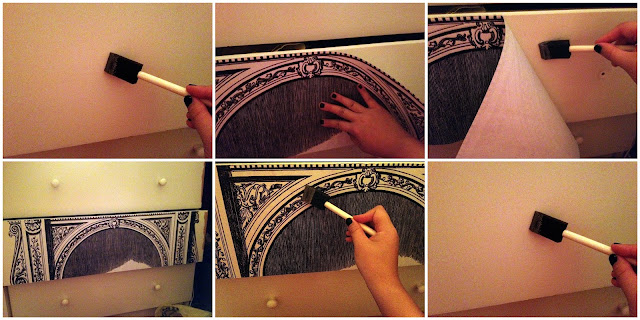
After making sure the surface of my dresser was clean and removing any knobs that were in the way, I started decoupaging. Since my image was so large, I didn't want to coat the whole thing in Mod Podge and have it get limp and difficult to work with so I applied some Mod Podge to the dresser and then stuck on the image, pressing down and smoothing out any wrinkles, put some more Mod Podge on the dresser and continued sticking on the image until the whole thing was on there. Once the whole thing had been glued down, I brushed over the top of the image with a coat (or two) of Mod Podge to seal it and waterproof it. And then I repeated the same process on the other drawers. I had to be a bit more careful to make sure they matched up to the center drawer though. And then once it was dry, I reattached the knobs I'd removed.
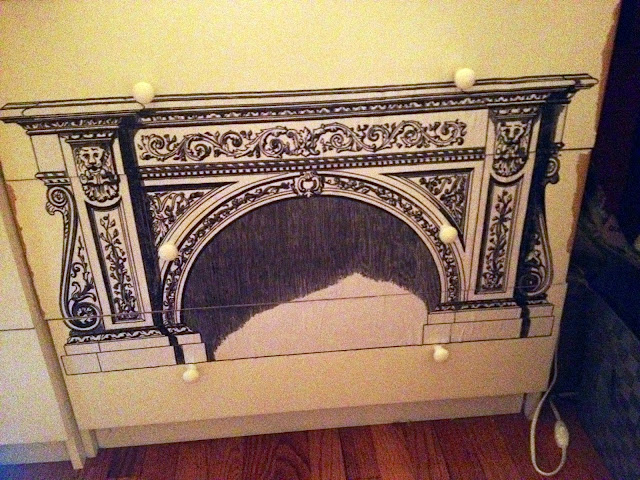
 Here's what the finished product looks like! I think it looks really sweet. This was a really fun project. It took 20 minutes to prep (cutting the image), 30 minutes to glue it onto the dresser, and 30 minutes to dry. EASY. So go, decoupage your heart out.
I was in a decorating funk lately - my room has been feeling v. blah - so I decided to do something about it and I did a little decoupage to vamp up my old, dying dresser. Decoupage is a type of arts & crafts activity where you glue bits of paper to something to make it prettier. It's as simple as that. My dresser was brand new when I got it from Ikea back when I was a sophomore in high school (10 years ago!). Back then, I loved white (actually, I still love white) so I got a white laminate dresser and now, 10 years later, it's starting to peel a bit on the edges of the drawers and it's starting to look a little rough. But now, I think it looks pretty awesome and the decoupage distracts the eye away from the peeling.
 What you'll need:
an image you want to place on your object (you can decoupage almost anything) printed onto appropriately sized paper
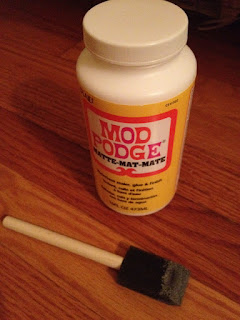
Mod Podge (available at most craft stores, I bought a jar at Michaels) - I like the matte version but they also sell glossy and satin finishes
foam brush, or a regular paint brush if that's what you have - make sure the bristles are soft and rinse immediately after use or else the Mod Podge will harden and ruin the brush
I started by measuring my dresser and choosing an image. I like this site because they have a lot of clip art in the style I wanted for my room - Victorian and classic - but you can use any site or image you want. Next, print out your image in the appropriate size. I had to use a plotter (meant for printing large scale plan drawings) and I used normal printer paper. If you're worried about tearing or wrinkling, you might want to use a heavier weight paper - I suggest FedEx/Kinkos for your printing needs.
I decided to use an antique fireplace image for my decoupage. I've always wanted a fireplace in my room anyway! You could use anything though - I was also considering ancient Roman friezes, stone griffin statues, and Egyptian vases.
 |
| I stuck my hand in the photo so you could get an idea of the scale of the image |


After making sure the surface of my dresser was clean and removing any knobs that were in the way, I started decoupaging. Since my image was so large, I didn't want to coat the whole thing in Mod Podge and have it get limp and difficult to work with so I applied some Mod Podge to the dresser and then stuck on the image, pressing down and smoothing out any wrinkles, put some more Mod Podge on the dresser and continued sticking on the image until the whole thing was on there. Once the whole thing had been glued down, I brushed over the top of the image with a coat (or two) of Mod Podge to seal it and waterproof it. And then I repeated the same process on the other drawers. I had to be a bit more careful to make sure they matched up to the center drawer though. And then once it was dry, I reattached the knobs I'd removed.


Comments
Post a Comment